Showing posts with label home. Show all posts

Saturday, October 31, 2015

Happy Halloween with a Ribbon Banner and a Pocket Card

Hi friends!  I hope you are doing well!  We are pretty good!  It's been a really busy day here and I'm just getting around to blogging.  Better late than never, I say!  Happy Halloween!  I hope you had an AWESOME day!  We did a bunch of activities today!  Brady said it was the best Halloween EVER!


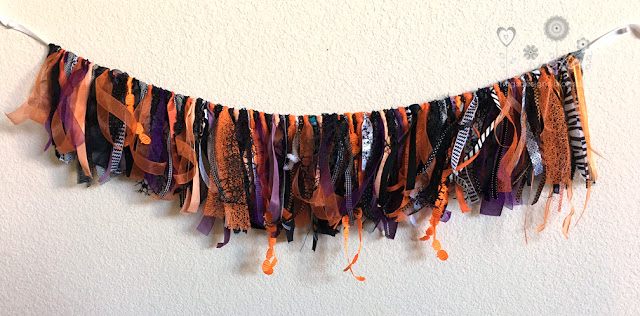
Today, I wanted to share a couple crafts I made for Halloween.  The first is a ribbon banner I made.  I was at a crop and a gal was talking about how easy it was to make these banners and after the parties she hosted she would sell these banners for $30 each!  She, however, made her banners with fabric so I think it might be a lot easier and it would take less knotting because you can cut the fabric thicker.  I looked at the project she was making and thought "well, I have TONS of Halloween ribbon and I can make that."  Oh boy!  This baby took me almost 4 hours of sorting ribbon, cutting, hunting for different kinds of ribbon, and knotting.  I had set out to make it 6-8 feet long so it could go on a table for a Halloween event we were going to and I stopped around 4 feet.  I literally could not do it anymore because my hands were so fatigued.  I also thought about trimming some of the ribbons but I kind of liked the special pumpkin ribbon sticking out from the bottom of the banner.

 I also wanted to share this Pocket Scrapbooking filler card that I made at my friend Rachel's crop.  Rachel had these as a make and take but I wanted to change it into a 3x4 card so I could use it in my scrapbook.  (I don't send out Halloween cards and didn't want this to go to waste.)  Rachel used her Close to My Heart cardstock and cut the words for us.  We also used the super cute tiny Close to My Heart Bitty Sparkles which are the tiniest little rhinestones I've ever seen and they are self adhesive.  I have already put this in my album waiting for pictures from today!


Have a great day, friends!  I hope you had a safe and HAPPY Halloween!

Thursday, February 26, 2015

DIY Foaming Soap

Hi friends!  I hope you are doing well!  We are pretty good.  I'm just trying to get the house in order because we are having some company tonight.  You know, because sitting down and blogging makes your house really clean...

Speaking of cleaning, I made a video today to show a tip for saving money on foaming soap AND using the soap that you can't ever get out of the bottom of the soap dispenser.  I like to use thick antibacterial soap for myself because I cook and change diapers and I want to know that my hands are SUPER clean afterwards.  However, I like to have foam soap for the kids since it's easier for them to wash off and they tend to use WAY too much soap to use the expensive stuff.


I think the thriftiest way to do this is to use soap dispenser from the regular store like the Softsoap one I have here.  HOWEVER, I think that they are catching on to people like me and I'm finding that the quality has gone down in these dispensers and they are only working for about a month and then they kind of crap out.  Here's a foaming soap dispenser you can get on Amazon.  I think I'm going to invest in one of these next.  The one I had from Pampered Chef (now discontinued) lasted for YEARS.

Have a great day, friends!

Friday, July 13, 2012

May Arts DT Try Out Round 2

Hi friends!  I hope you're having a fabulous day!  We are enjoying a slightly cooler day here which is wonderful!  We are off to a BBQ tonight which should be great!

For those of you who follow my blog, you might have read that I'm trying out for the May Arts Ribbon Design Team.  I've already made it to Round 2 and today, I'm sharing my round 2 tutorial and project with you.  I've created a video tutorial for a technique I made up called Fishtail Ribbon Technique.  It is inspired by the fishtail braid hairstyle that I used to wear as a girl.


I took my three completed ribbon fishtails (all made with May Arts stitched grosgrain ribbon) and made this canvas.  I wanted the paint to have a very rustic distressed look on the canvas.  I hope that I achieved that.  I spelled out the sentiment with some Thickers, added some flowers, and some rhinestones.

I hope you have a great weekend and please keep your fingers crossed for me!  

Wednesday, March 28, 2012

Chalkboard Reveal

Hi friends! I hope you're well! It's raining here so hopefully, I will be up to getting out and about soon or my children will go STIR CRAZY! Next week is spring break, so let's REALLY hope that the weather is better by then.

Yesterday, I showed you THIS, you could see it on the Paper Made Bakery blog HERE:
And today, I wanted to reveal the whole project. I made this for the Moxie Fab World Paper Scraps challenge. I used all the scraps from my Sunday Afternoon Kit from Paper Made Bakery. I still have TONS of paper left but I wanted to use up my scraps.

The chalkboard is from Darice, I got it at Joann Fabrics. I punched 1 inch squares from my scraps. I used Mod Podge to put it on the wood around the chalkboard and then I trimmed off the excess. I painted a layer of Mod Podge over the top. I took the bottle cap embellishment and die cut a circle from some of the same Webster's Pages Sunday Afternoon paper. I added a picture of the kids that came free with Brady's school pictures. Then I glued it to the chalkboard and added some gems, also from the kit.
Have a great day, friends!

Sunday, November 27, 2011

EAD Frame with Vinyl

Hi friends! I hope you all had a great weekend! I am NOT ready for life to go back to normal tomorrow. :( Oh well. Today, we headed out to the mall to go to the Apple Store for Dustin to get his computer fixed. We also hit up a few stores and had lunch there. It was a nice afternoon. After we got home, we put up our Christmas tree. Fun day!

Today, I have another home decor project to share with you. I'll bet you all thought I didn't have it in me to do all these non-card projects. ;) Well, I didn't either. I decided to make a frame with the EAD Designs You are loved always vinyl. That is a message I want my boys to know ALL the time and carry in their hearts so I wanted to make a sign to show them.
I also made a video to show how to make this project:


Have a fabulous day, friends!

Thursday, November 17, 2011

Please Excuse the MESS. The Children are Making Memories


Hi friends! Sorry that I haven't been blogging as much lately! I'm still feeling under the weather. I had a couple days where I felt ok and then went right back to feeling sick again. The kids seem to be doing ok though.

Ok, today I have a project using some EAD Designs vinyl and some art my kids made. I used the new EAD Designs Please Excuse the Mess vinyl, a cheap canvas and some paint. And my kids. That might have been where I went wrong. This is SOOO much darker than I was hoping for since the kids just smushed all the paints together. But they are SO PROUD of their work.
And I also made a video showing you how we did it.


Have a great day friends!

Monday, November 14, 2011

EAD Video: Child's Art Wall Gallery

Hi friends! I hope you had a great weekend!

Today, I'm sharing a video I made to show you how I did a gallery wall for Brady's school art. I used the Every Child is an Artist wall vinyl from EAD Designs. Enjoy!


Monday, October 3, 2011

EAD Blog Hop! ETA: And a GIVEAWAY!!!!!

***For my Lawnscaping post please scroll down or CLICK HERE***

Hey! Guess what?!?! I'm guest designing for EAD Designs this month! Woohoo!!! I've been a huge fan of this company for a very long time and I'm HONORED to be designing with them this month! If you are just stumbling into my blog, be sure to go back to the EAD Blog to start the hop! There is a giveaway hidden somewhere on the hop so leave comments at each stop!

I absolutely LOVE their products! EAD actually turned me around about rub-ons, I used to despise them but their vinyl rub-ons are like BUTTER! I won't use any other rub-ons! And their Stickerz are SO fabulous! And everything else they sell on their site! PLUS not only is Emily (the owner) one of the nicest and more generous women I've met in this industry but the design team is FABULOUS! Can you tell I'm a little excited?!

I have two projects to show you. First up is some wall art. I saw something like this on Pinterest and I HAD to have it! I asked Emily to see if she could create something like this for me and she did! WOOT! The EAD site had a Design Center where you can create your own custom designs.

First the close up. You can see that I have textured walls and that's no problem at all. This took less than 5 minutes to put up. You can buy this wall art HERE! It's only $10! I cannot believe the value!
And where I have it displayed in my house. (Inset collective AWWWW!) That's right, over my canvas print of the boys from Easy Canvas Prints. Also, look how well this goes with the border in my house!
And since that took me only 5 mins, I felt guilty not actually showing you a creation so I made a card too. I made this card using Card Positioning Systems sketch #238. I used the panda from Kawaii Friends Stickerz and I used a sentiment from Random Sayings. The paper is from My Mind's Eye Fine and Dandy. I'm also entering this into the Hope You Can Cling To challenge to use Pink and Bling to support breast cancer.
Up next on the blog hop is LAUREN!

ETA: And I have a GIVEAWAY!!! Would you like to win one of those "There's these boys" wall vinyls?! Just leave a comment and you can WIN it!!